Motor Project # 12 - Deep Breathing Exercise!
This project is provided by KARL WOLF and is meant to educate.


CAUTION: This project is NOT for the beginner mechanic and should only be attempted if you are confident in your mechanical abilities and fabrication skills, and you understand the functions of the intake side of the OBD II engine management system.
Karl continues with some performance modifications to the stock air filter box.
Here's Karl:
This modification is designed to eliminate the airflow restrictions in the standard airbox. This project can be combined with the spark plug change, the intake manifold porting, and throttle body cleaning (projects 5, 10, and 11) to make for a complete afternoon intake tune-up.
In almost all current engine designs, the throttle body should be the real engine airflow limiter. My modifications of the airbox and intake allow the throttle body, not the airbox to be the limiting factor in the air intake system. The airbox on the Jaguar X-Type is limited by packaging and noise devices designed into the air intake system. I have reduced how these designs impact airflow.
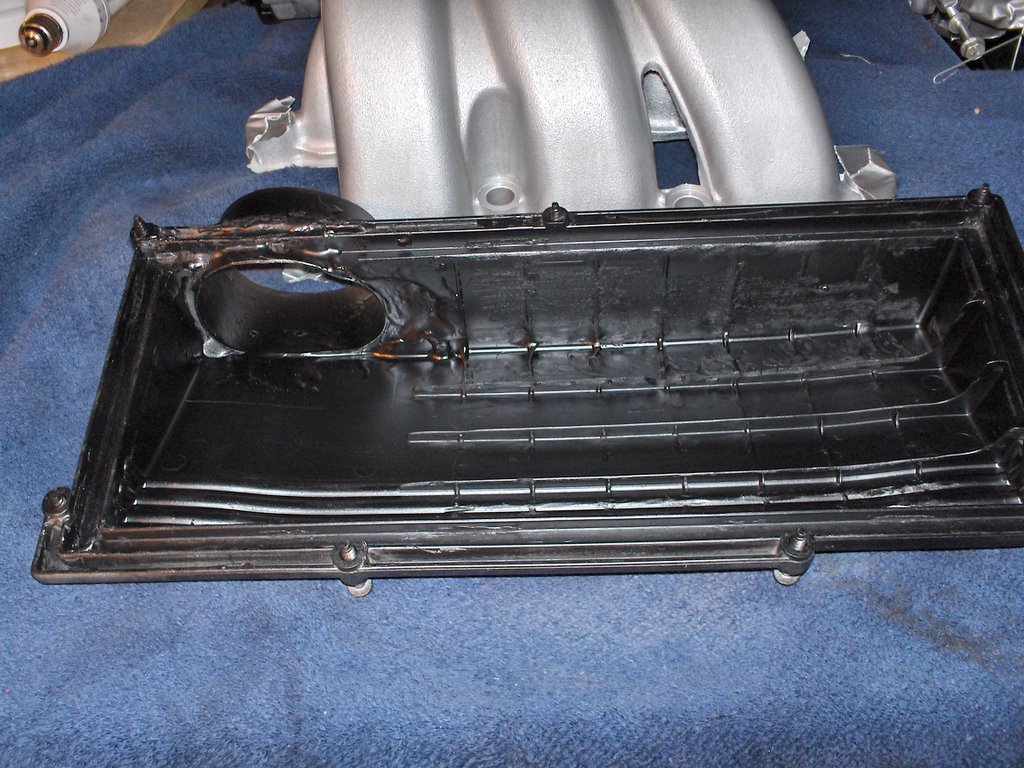
The main modification is in the top of the airbox. To disassemble the top air box half, first remove the factory inlet hose clamp. The standard clamp can be easily removed with a pair of pliers and a small flathead screwdriver. Squeeze the two large tabs together gently and pry the upper band end from the lower band end. If you are careful, you will not damage the clamp and it can be re-used. Carefully remove the MAF sensor (two screws) and set aside. Unscrew the top and look at it from the inside.
Let's start by looking at two pictures of the top air inlet box disassembled:


Focus your attention on the baffle plate seen in these two pictures. It protrudes into the path of the inlet tube. You can see the base of this plate at the bottom right hand corner of the inside of the air box.
I removed all the lateral raised plastic from the inside of the top with a dremel, but a file or sharp blade could be used. This baffle is designed to break up the airflow to reduce noise. The reduced airflow, of course, restricts performance. The major restriction is where the airbox meets the 3" output tube. As you can see in the first picture, the lower portion is totally obstructed.
You now have two options to modify the top cover:
Option One (simple solution):
CAREFULLY remove as much of this restriction as possible with a file, dremel, etc. This is the real bottleneck in the airflow. Take your time so you do not cut through to the outside of the box. Don't be too concerned about the area near the inside lip of the box because the filter gasket will seal this area. This is the easiest modification and my original solution. 
If you stop at this point, you've made a big improvement in air flow to the TB, but this still leaves almost 1/5th of the airflow blocked. See this picture with the baffle completely removed.
For even greater air flow:
Option Two (more serious modification):
Remove (cut) the 3" tube which houses the MAF sensor as close as possible to the airbox top. Purchase a 3" aluminum or thin gauge steel tube. You only need about 3." I used a piece from an old intake. Make an oval out of the tube and set it inside the airbox top. Make sure that it covers the original opening completely. Trace around the tube and then cut inside the lines. Use a dremel or drill a number of holes and "connect the dots." Finish by trimming until you get a tight fit. 

Sand all the edges and rough up the surfaces. Make sure you have at least 1" available on the outside to clamp the new connector tube. You will have to trim this to fit later. I used two self-tapping screws to hold it in position and cut off the protruding tips. Use flexible two-part epoxy to seal the tube to the airbox lid.
Clean all the surfaces completely. Finish off with a quality vinyl paint on the outside and Armorall or silicone spray (well wiped off) on the inside. Trim the inside of the MAF tube so that air will flow smoothly into the tube. Connect the MAF tube to the metal airbox tube with a silicone 3" connector and hose clamps.
Next, I modify the cold air intake (lower portion of the airbox) by adding an additional cold air pickup next to the two existing cold air inlets.
Continue disassembly by removing the lower airbox and use a holesaw to drill an additional 2" hole. Purchase the 2" flexible tubing at any auto parts store. It is sold as heater or intake tubing. The flexible 2" duct routes over the top of the radiator and next to the stock intake tubes. This will allow more airflow into the lower part of the airbox.
 A picture of the lower portion of the airbox is shown here in place with the new air inlet modification. See the third air inlet to the far right of the box, next to the two original oval inlets.
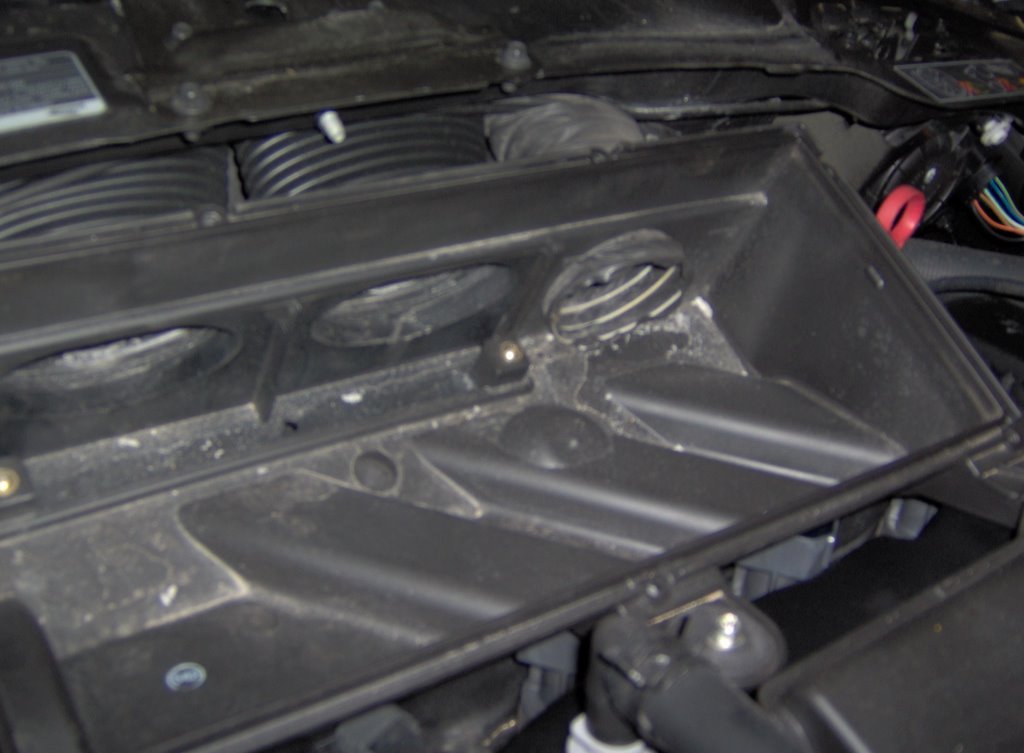 A picture of the lower portion of the airbox is shown here in place with the new air inlet modification. See the third air inlet to the far right of the box, next to the two original oval inlets.
Here is a picture of the grill. Although a little difficult to see, the additional cold air inlet is just barely visible to the left side of the original left air inlet.  Here is a picture of the air box reassembled after all of the modifications. Very little has changed in appearance from the stock air box. I use a K&N filter, but you can use a stock filter. Just make sure to replace it regularly.
 Here is a picture of the air box reassembled after all of the modifications. Very little has changed in appearance from the stock air box. I use a K&N filter, but you can use a stock filter. Just make sure to replace it regularly.
Cost? About $15.00 in parts. Time? One hour for the simple solution. Two to three hours for the more complex solution. The great thing about these mods is that unless you know what you are looking at, the air intake looks totally stock and really does not change anything but allows more airflow. You may notice a very small increase in intake growl but it is only due to the increase in airflow, not the growl associated with an aftermarket air intake. These aftermarket intakes take air from under the hood. Some of the benefits of these kits are negated by the additional heated underhood air.
Notice to all blog readers: We're looking for more projects that will help you improve performance of your Jaguar X-Type. What would you like to see next? Here's an incentive: Anyone want to see the actual HP increase for this project via Vericom results? Just use the "post comments" on this blog with a request for another project you would like to see and your email address! We'll email the results to you as a thank you!
Coming soon: We're hot on the trail with some exhaust modifications. You might remember in project #3, we examined the stock exhaust layout used on the X-Type. It offers a bounty of performance opportunities and we're taking advantage of all of them. See it in an upcoming project post.
posted by skhannes at 3:06 AM
![]()
![]()

6 Comments:
Great stuff, as usual!
How 'bout supercharging?
GHG@GeoffreyGoldberg.com
Excellent stuff
+1 on the supercharging
There are many requests for supercharging and turbocharging. The duratec was designed specifically to take every advantage of natural aspiration, one of which is very high compression ratios. 10.3:1 for the 2.5 and 10.5:1 for the 3.0. This is not an ideal compression ratio for forced induction which is usually 8:1 to 8.5:1. The AJV8 supercharged, for example is 9:1 and the naturally aspirated AJV8 is 11:1. That doesn't mean it isn't being looked at, just a MUCH bigger challenge to make it right.
Finally, and I'll talk more about this in future blogs, the X-Type drivetrain, especially the transfer case is very rickety to put such HP potential in front of it.
Great project. will be changing my air box when weather gets warmer, cant stand working in the cold. For another project.... what about handling. getting round those corners, getting the extra power down etc. Keep up the good and informative work.
great info! I've seen many mods listed for modifying AIT sensors. Is there really any truth to these mods. If so, can you show us how? thanks. Aaron
aaron_mack8@hotmail.com
P.S. what is the hp increase for your air box mods?
Wonderful blog you've got here!
I purchased a used 2004 3.0L x-type last week. It is a beautiful car, however the previous 2 owners didn't maintain it very well. The rear differential is being replaced under warranty courtesy of Ford/Jaguar Inc.
I noticed that the brakes were "stiff", in that when you apply them they seem to do little in the way of slowing the car. You have to stand on these buggers.
The car has 48k miles on it and I thought that this might be an opportunity to upgrade them, however I have yet to find an aftermarket big brake kit.
What are your thoughts about upgrading the brakes and do you plan on doing a brake upgrade blog?
Post a Comment
<< Home